User:John Richardsim/Editing Guide
The following is a series of lessons on editing the wiki. If you have any questions, feel free to send me a PM on the forums. Note that this guide will remain a work in progress for a little while.
Update: there are a few things in this guide that are outdated as of the November 2016 site update (e.g. how to enter the editor). I will fix these eventually.
Lesson 1 - Types of Pages and Basic Editing
Introduction
Alright, I'd like to start off this first lesson by thanking you for taking the time to learn more about the wiki. As I have recently noted in the State of the Wiki: November 2015 address, I greatly appreciate help with the wiki. It is a project that I greatly care about, but it just cannot be done alone.
Rules
Before we dive in, let me first remind you of a few rules about the wiki:
- You must be a registered member on the forum to edit pages.
- Please respect copyrights. Do not submit copyrighted work without permission.
- Editing this wiki to the disadvantage of other users through vandalism, misinformation, or removal of event help is not tolerated.
- Please try your best to format your work well. Try to write in a formal style (i.e., avoid writing in first and/or second person) (the exception to this is in user pages; use as much first and second person as you wish).
- Consider moving and/or revising old information instead of deleting.
- Before removing significant amounts of information, please describe why the information is being removed in a talk page.
Types of Pages
First, let's discuss the common types of pages, as these are terms that will be used often:
- Event Pages - these pages contain information regarding both current and previous official events and trial events.
- Team Pages - these contain information about a school/team (example: Interlake High School).
- State Pages - contain information about Science Olympiad in a specific state, including a list of teams, competitions within the state, and previous state champions and runner-ups (example: Michigan).
- Invitational Pages - contain information about specific invitational tournaments (example: Tiger Invitational).
- User Pages - these pages are personal pages to describe a bit about yourself and your time in Science Olympiad.
- Talk Pages - these are for discussing the content of a particular article (example: Talk:Anatomy and Physiology). They may be accessed or created by clicking on the "Discussion" link in the top right of a regular page.
- Test Exchanges - these are lists of practice tests for the official events of their corresponding year.
Basic Editing
Okay, now that we've established the typical kinds of pages, let's learn how to make a basic edit. You may access the editor for an entire page by clicking the "Edit" link in the top right of the page you want to edit, or you may also access the editor for a specific section by clicking the "[edit]" link found to the far right of each section title.
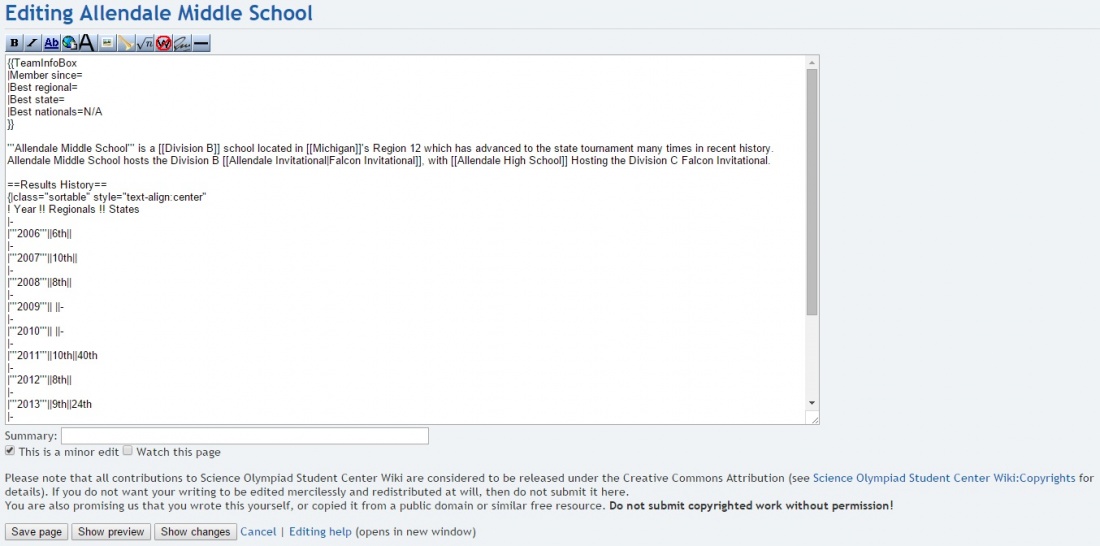
After you have accessed the editor for what you want to edit, you will be met with the editor. It looks something like what is pictured below (note: I have changed my preferences to make the editing box larger).
After you have completed typing your edit, feel free to summarize what your edit was in the summary line. You may also select the options of denoting your edit as a minor edit and "Watch this page", which will make any edits to the page appear in your watchlist. To access your watchlist, click the "Watchlist" link under the section "User Information" to the left of the page.
To save your edits, click the "Save page" button. However, before you do this, it is highly recommended that you double-check your edits by clicking the "Show preview" button. This will bring up a preview of what the page/section will look like with your edit. But be careful; it is only a preview, and to actually save your edits to the page, you must scroll down to the editor below the preview. You may also choose to view specifically what you have changed by clicking the "Show changes" button.
Well, that's all I have for this lesson. Stay tuned for the next lesson which will cover text options and how to create pages, add sections, and add links.
Lesson 2 - Creating Pages, Adding Sections, Adding Links, Lists, and Font Options
Introduction
Now that we've established the principles, let's look into several of the most common tasks. This will be a rather long lesson, but it contains some of the most essential skills of editing the wiki.
Creating Pages
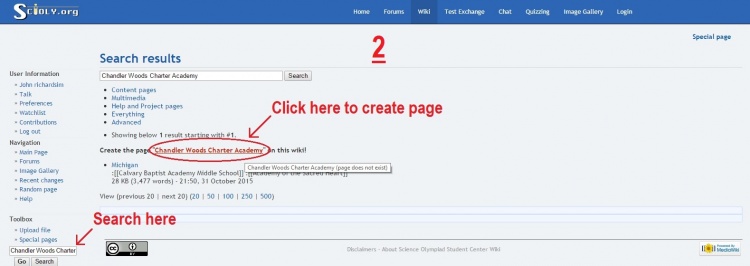
One common question that arises when editing the wiki is how to create pages, which is generally not as clear as how to edit existing pages. The editor for creating new pages may be accessed in two main ways: 1) by clicking a red link on a currently existing page, or 2) by clicking the red link when searching for a page that does not exist. A common example of the first method is the list of teams on state pages. Most of these links are red links, as the page they link to does not exist. There are thousands of these red links on existing pages (once again, many of these are links to team pages), and a full list (ordered by the number of pages that link to them) can be found here. The second method requires you to search for a specific page in the search bar, located on the left of your current page under the "Toolbox" section. Once you have searched for your page, if a page by the same name does not already exist, a message reading "Create the page "(Insert Page Name Here)" on this wiki!" will appear, and the page's name will be a red link. From here, just click on that red link. Either of these two methods will give you access to the editor for creating a page. When creating a page, the editor generally looks very similar to the editor when doing a regular edit on a page, with only three small differences: 1) "Creating" appears before the page name (this will be taken out when you create the page), 2) a short message appears above the editing box, and 3) there is no option for denoting your edit as minor. Again, I have changed my preferences to make the editing box larger, so yours will look smaller.
Please follow several guidelines when creating pages:
- Capitalize the page name appropriately.
- When creating team pages, do not abbreviate Middle School "MS" or High School "HS".
- Please refrain from creating pages with only one or two sentences containing minimal information. Likewise, make sure the page contains links to at least one other page (when creating team pages, it is strongly recommended to at least have a link to the state that the team is from). Pages which do not contain a link to another page are known as "dead ends".
- Add the categories that the page falls under at the end of the page (categories will be the topic of a future lesson).
Creating Redirects
Redirects are pages that automatically send a user to a different page (e.g., GA redirects to the Georgia page). To create a redirect, follow the same general procedures outlined above to access the editor for a new page. Once you have reached the editor for the page you wish to redirect to another page, just insert "#REDIRECT[[(Inset Page to Redirect to)]]" (of course, replacing the "(Inset Page to Redirect to)" with the title of the page you wish to redirect to). To access a redirect page, start by clicking on a link to the redirect page you wish to access. It will automatically redirect you, but at the top of the page it redirected you to will be the message "(Redirected from (Redirect Page Name))". Click on the link of the Redirect page name, and it will now bring you to the redirect page without automatically redirecting you. From here you may edit the redirect if necessary, view its history, etc.
Adding Sections
To keep a page organized, they often contain individual sections. For example, this text is currently in a section entitled "Adding Sections". A section (of a given level) may be divided into subsections (sections of a lower level). For example, a level 2 section may be divided into several level 3 sections, and each of these level 3 sections may be further subdivided into multiple level 4 sections. When editing, sections are added by putting the same number of equal signs before and after the title of a section. The number of equal signs on each side is the section level it is. For example, by inputting "==Example A==", a level 2 section entitled "Example A" will result. By inputting "===Example B===", a level 3 section entitled "Example B" will result. Note that level 1 sections are not used when editing pages, as the tile of the page is displayed in the form of a level 1 section. Also, try not to use level 5 sections too much, as they result in the title of the section appearing the same as bolded text.
Wow, looking back at that paragraph, I used the word "section" quite a bit...
Adding Links
As mentioned earlier when discussing how to create pages, every page should contain a link to at least one other page on the wiki. Likewise, sometime you may also want to add links to other web pages outside of the wiki. These two types of links, known as internal and external links, require slightly different inputs and have slightly different outputs as well.
Internal Links
Internal links are links to other pages on the wiki. They are done by placing double brackets around the title of the page you would like to link to ([[Title of Page]]). For example, by inputting [[University of Wisconsin 2016]], the result is University of Wisconsin 2016, and by inputting [[2016 Test Exchange]], the result is 2016 Test Exchange. Notice that both of these links appear blue, as they link to a page that exists. If one links to a page that does not already exist, it will appear red and clicking it will bring up the editor for creating a page (example: Clague Middle School).
If you want to link to a page, but you also want to have the text that links to it be something other than the title of the page, you may do this by putting the link in the format of [[Title of Page You Want to Link to|Text that you want to appear as the link]]. For example, if you want to link to Troy High School (California), but you don't want the "(California)" specification to show up in the text of the page, you would input [[Troy High School (California)|Troy High School]], which will yield a link looking like this: Troy High School (if you put your cursor over the link, you can see it links to the page "Troy High School (California)"). If you wanted to link to California (North), but wanted the link to appear as "Northern California", then you would input [[California (North)|Northern California]], yielding the link Northern California as a result (again, if you put your cursor over the link, you can see that it links to the page "California (North)").
If you want to link to a specific section of a page, put the link in the form of [[Title of Page#Section Name]]. For example, if you want to add a link to the section "Past State Champions" from the Illinois page, you would input [[Illinois#Past State Champions]], yielding the link Illinois#Past State Champions. As described in the previous paragraph, if you want the text that links to that section to be "Past State Champions of Illinois", then you would input [[Illinois#Past State Champions|Past State Champions of Illinois]], yielding the link Past State Champions of Illinois. If there are multiple sections of the same exact name in the same page (for example, in the page National Results History, there are two sections entitled 2001, one for the Division C 2001 National Tournament Results, the other for the Division B 2001 National Tournament Results), the specific section you want must be denoted by an underline followed by the order of the section if it is not the first section entitled that. For example [[National Results History#2001]] will yield the link National Results History#2001, creating a link to the first section entitled "2001" on the page. However, if we wanted to link to the second section entitled "2001", we would input [[National Results History#2001_2]], yielding the link National Results History#2001_2, which directs the user to the second section entitled "2001" on the page. If this last bit seems really confusing, don't worry, as this hardly ever happens.
External Links
External Links are those which link to web pages outside of this wiki. For example, if we wanted to link to soinc.org, there would be several options of how to format it, each yielding a different appearance.
If we want the url to appear and serve as the link itself, we would just input the full url without any brackets (example: https://www.soinc.org/)
If we want to have the link be abbreviated into a number, we would just put a single set of brackets around the url (example: inputting [https://www.soinc.org/] yields the link [1]). The numerical value automatically shown in the brackets indicates the link's order among other undefined external links in the page (that example is the first of the such in the page).
If we want to add our own text to serve as the linked text, we would put a single set of brackets around the url and our text, and have our text and the url separated by a space (example: inputting [https://www.soinc.org/ Home Page of soinc] will give the result of Home Page of soinc).
Lists
Lists can be used in a variety of ways on pages. There are three main types of lists. Depending on what is being listed and how it is being listed, one type may be more useful than another.
Bulleted Lists
Bulleted lists may be created by adding asterisks before each section of text being bulleted. The number of asterisks added before the text determines its indent. For example, inputting:
*Bullet 1
**Indented Bullet 1
*Bullet 2
Will give the result of:
- Bullet 1
- Indented Bullet 1
- Bullet 2
Ordered (Numbered) Lists
Ordered lists are similar to bulleted lists, but they utilize numbers instead of bullets. They are created by adding number signs before each section of text being numbered. The number of number signs before each section determines the indent. For example, inputting
#List Entry1
#List Entry2
##List Entry2a
Will give the result of:
- List Entry1
- List Entry2
- List Entry2a
Indented Lists
Indented Lists simply indent the text being listed without numbering or bulleting. They are created by placing colons before each section of text being indented. The number of colons placed before each section of text being listed determines its indent. For example, inputting:
:List Entry1
:List Entry2
::List Entry2a
Will give the result of:
- List Entry1
- List Entry2
- List Entry2a
Font Options
There are several ways you can alter the font of the text.
Bold Text
To make text bold, place three apostrophes on each side of the text you want to make bold. For example, inputting '''Bolded Text''' yields the result of Bolded Text.
Italicizing Text
To italicize text, place two apostrophes on each side of the text you wish to italicize. For example, inputting ''Italicized Text'' gives the result of Italicized Text.
Colored Text
You can change the color of text from the default black color. For example, by inputting the following:
<b style="color:red">red text</b>
<b style="color:orange">orange text</b>
<b style="color:yellow"> yellow text</b>
<b style="color:green">green text</b>
<b style="color:blue"> blue text</b>
<b style="color:violet"> violet text</b>
We get a result of:
red text
orange text
yellow text
green text
blue text
violet text
To keep it formal, please restrict your use of colored text to user pages and team pages (and even then, I'd recommend using it sparingly).
Wow, that lesson really did end up being super long. Thank you for joining me and I hope to see you in my next lesson which will cover adding files.
Lesson 3 - Adding Files
Now that we have covered how to perform some common tasks in Lesson 2, let's go over how to do what is generally the most complicated routine task: adding files.
Uploading Files
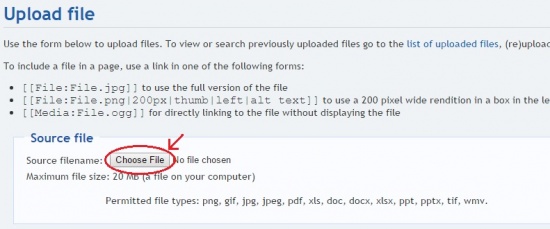
The first step to adding a file to a page, uploading a file, is the same for all types of files. To upload a file, click the link "Upload file", found underneath the "Toolbox" section to the left of an article. From here, you may click the "Choose File" button to select a file from your computer to upload (please note the maximum file size (20 MB) and list of permitted file types (png, gif, jpg, jpeg, pdf, xls, doc, docx, xlsx, ppt, pptx, tif, wmv) listed below it).
Adding Pictures to Pages
After a picture file has been uploaded, there are a couple of options for how to include the picture into a page.
Adding a Full Image
To add a full image to a page (for example, as seen on the right and left of here), add a link to the file in the following form: [[File:(Insert File Name Here).Type of File]]. For example, entering [[File:sciolylogo.png]] yields the following image:
Woah there, that's kind of...huge. In order to control how large the image appears, just add "|(insert number)px" into the link after the file name. For example, by inputting [[File:sciolylogo.png|800px]], we get a result of:
Hmmm, it's still a bit too large. Usually you will have to tinker with the size a few times through trial and error to get it perfect. When doing this, I strongly recommend that you use the "Show preview" button next to the "Save page" button. This will display a preview of the page with your edits to it, and the editing box will be at the very bottom of the page. Just remember to click the "Save page" button to save your edits to the page once you have found the perfect size for the picture.
Ah, that's more like it. Alright, now that we know how to manipulate the size of the image, let's look into how to change the location of the image on the page. There are three options for this: left, center, and right. This is done by adding "|left", "|center", or "|right" into the link after the file name. For example:
- Input 1: Image [[File:sciolylogo.png|300px|left]] with left alignment.
- Output 1: Image with left alignment.
- Input 2: Image [[File:sciolylogo.png|300px|center]] with center alignment.
- Output 2: Image with center alignment.
- Input 3: Image [[File:sciolylogo.png|300px|right]] with right alignment.
- Output 3: Image with right alignment.
Once again, you can tinker with the location of the image a bit, but I still strongly recommend just previewing your edits by clicking the "Show preview" button until you you have the best alignment. And as always with previewing, remember to click the "Save page" button to save your edits to the page.
You may notice that trying to get images into a specific location may be very difficult and the placement may be awkward (this especially true for center alignment). Generally, the best and most used alignment is right, but if right alignment just can't work out, I would recommend trying left alignment.
Most images require some sort of explanation of what it depicts. To add a short description of the image, add "|thumb|(short description)" to the link after the file name. For example, inputting [[File:sciolylogo.png|300px|right|thumb|The logo of scioly.org]] yields the image seen to the right:
Note: the order of these image formatting options in the link does not matter. For example, [[File:sciolylogo.png|thumb|300px|right|The logo of scioly.org]] will give the same result as [[File:sciolylogo.png|right|The logo of scioly.org|thumb|300px]].
Linking to a Picture Without Displaying It
On occasion, it would make more sense to link to the full picture rather than to try to display the full image on the page (for example, the images linked to in the section State Competition Results of Hawaii would be far too large to reasonably put all of them on the page). If this is the case, you may link directly to the picture by entering the link in the following format: [[Media:File Name.Type of File]]. For example, inputting [[Media:2016 MT B Results.jpg]] yields the following link: Media:2016 MT B Results.jpg.
Similar to linking to other pages on the wiki, you may control the text that links to the image by following this form: [[Media:File Name.Type of File|Text that links to image]]. For example, inputting [[Media:sciolylogo.png|The logo of scioly.org]] yields the following link: The logo of scioly.org.
Linking to Documents
Now that we've covered how to deal with pictures, let's look into how to link to documents. Please note that the preferred file type for most documents is PDF, as they generally can save some server costs for space and are viewable on most devices. The most common exception to this rule is timed PowerPoints, often used in tests for identification events.
Linking Directly to a Document
To link directly to a document (i.e., to bypass the file page (here is an example of a file page: 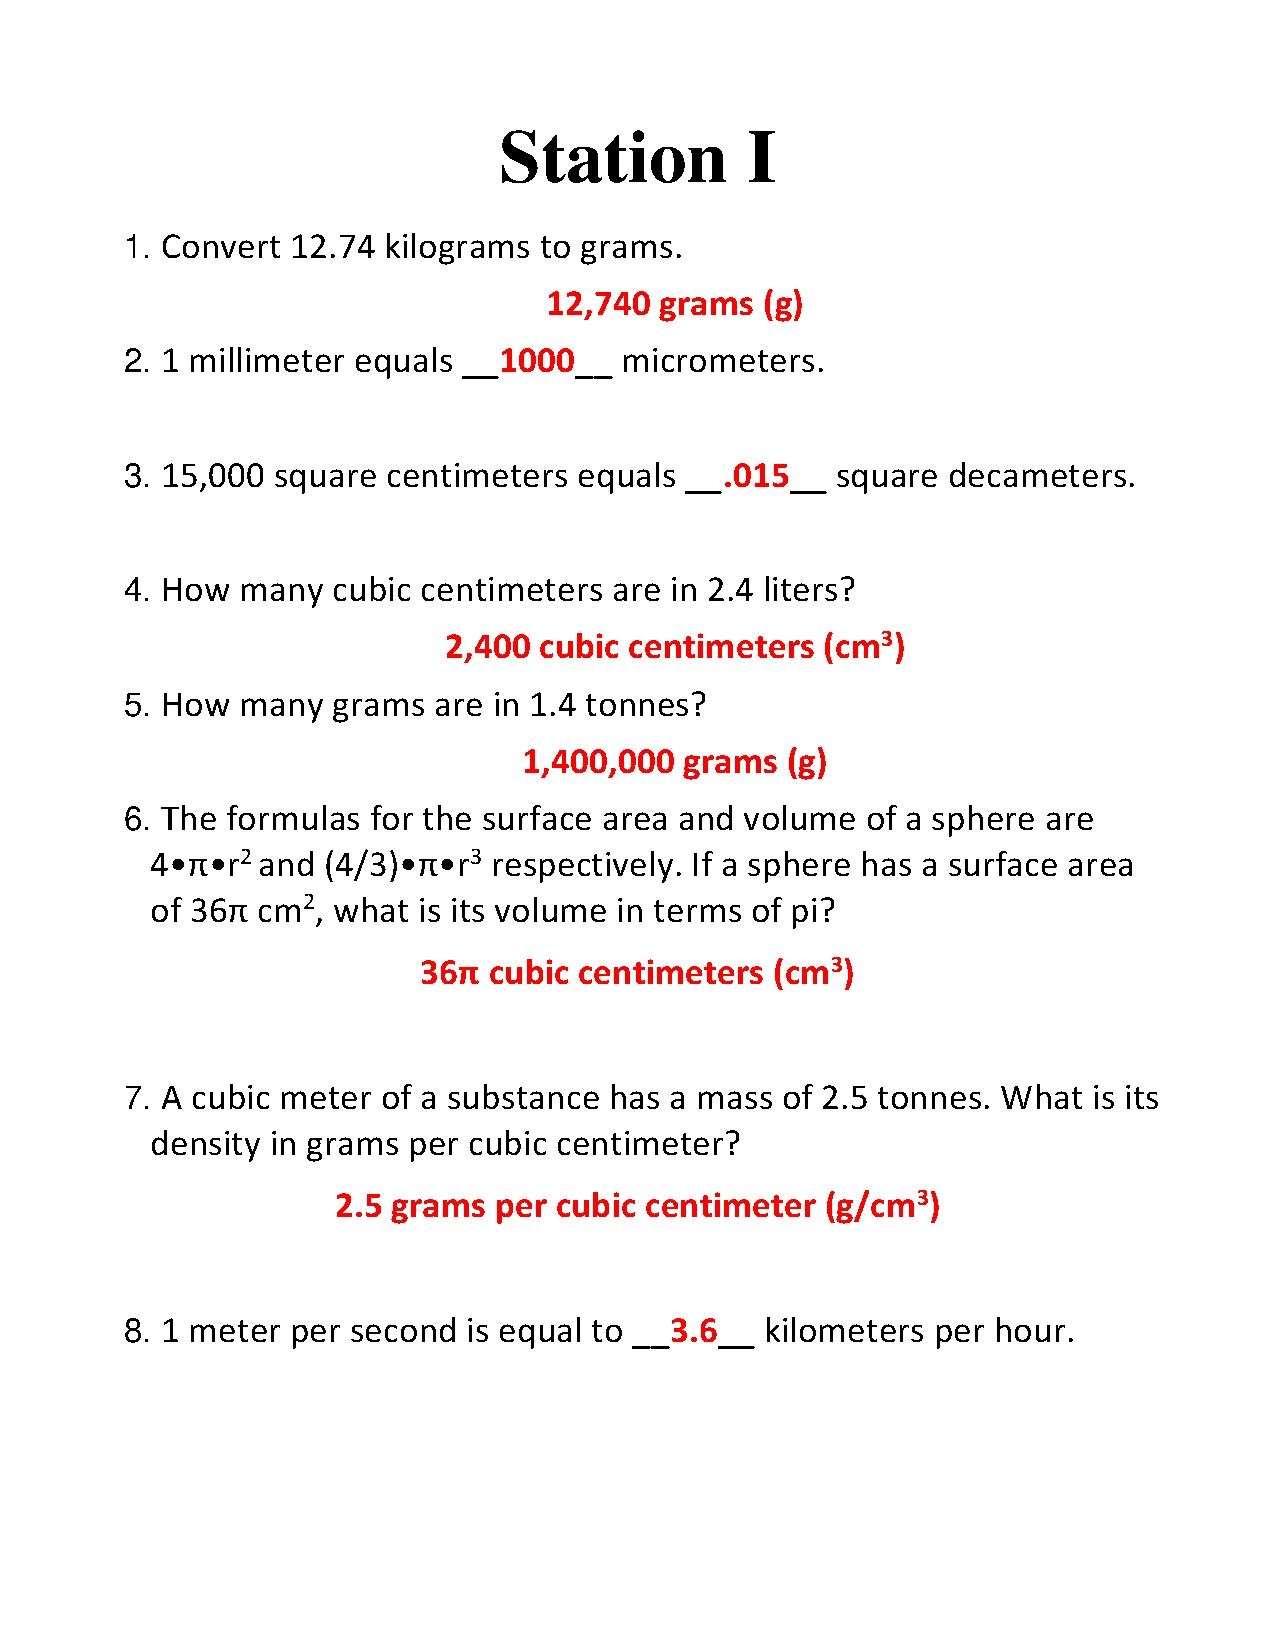 )), you enter the link in the format [[Media:File Name.Type of File]]. For example, to link directly to the file linked to above, the input would be [[Media:Bio-Process Lab Key.pdf]], yielding the link Media:Bio-Process Lab Key.pdf as a result.
Similar to regular internal links, you may change the text that links to the document by adding "|(text that links to document)" within the brackets of the link after the file name/type. For example, the input [[Media:Bio-Process Lab Key.pdf|Bio-Process Lab Practice Test Key]] will yield the result of Bio-Process Lab Practice Test Key.
Linking Indirectly to a Document
To link indirectly to a document (i.e. to link to the file page, which has a link to the file), put the link in the form [[File:File Name.Type of File]]. For example, the input [[File:Bio-Process Lab Key.pdf]] will yield the result of  . Sadly, the link must appear in this form; you cannot change the text that links to the file page.
Note that linking indirectly to a document is hardly ever used; most links to documents will be direct.
Adding to the Test Exchange
One of the most common places documents are added to is the test exchange. Remember: if possible, please put documents in PDF form. The most common exception to this rule is timed PowerPoints, often used in tests for identification events. If a file is not in PDF form, specify in parentheses e.g., (DOCX), (PPT). Links to documents on the test exchange will be direct links (how to make direct links to documents was covered back in the "Linking Directly to a Document" section). When adding the links to a test/key, try to follow a similar format as the rest of the page. For example, it is generally recommended to put a short description of where the test is from or what the test is in a level 1 bullet, and then put links to the test and answer key in separate level 2 bullets with "Test" and "Key" serving as the text that links to the documents (for more information on how to make bulleted lists, please see this section).
Update
I've decided to put this project on hold indefinitely. If you have questions, shoot me a PM on the forums and I can answer it.


